Chaos;Head NoAH Completion Guide

The following is a guide to playing through Chaos;Head NoAH in the optimal route order and achieving all endings.

Chaos;Head NoAH is available on Steam and Nintendo Switch digitally; a physical release through the Chaos; Double Pack is also available.

The recommended play order is as follows: Silent Sky → Crying Sky → Daydream → Moon and Sun → A Bloody Contract for Your Sins → A Disease that Leads to Slaughter → Deus Ex Machina → Anima Archetype → Blue Sky.

Players using the Chaos;Head NoAH Overhaul Patch are advised to follow this guide instead.

You can watch the video, or read the guide below.

0 of 34 achievements complete 0%
Endings 0/9
Positive Delusions 0/45
Negative Delusions 0/45
Missable CGs 0/8
Whose Eyes Are Those 0/18

Preface: Delusion Triggers

At different points in Chaos;Head NoAH, you will come into contact with the “Delusion Trigger” system. Through it, you can choose if the protagonist experiences a positive delusion, a negative delusion, or no delusion at all.
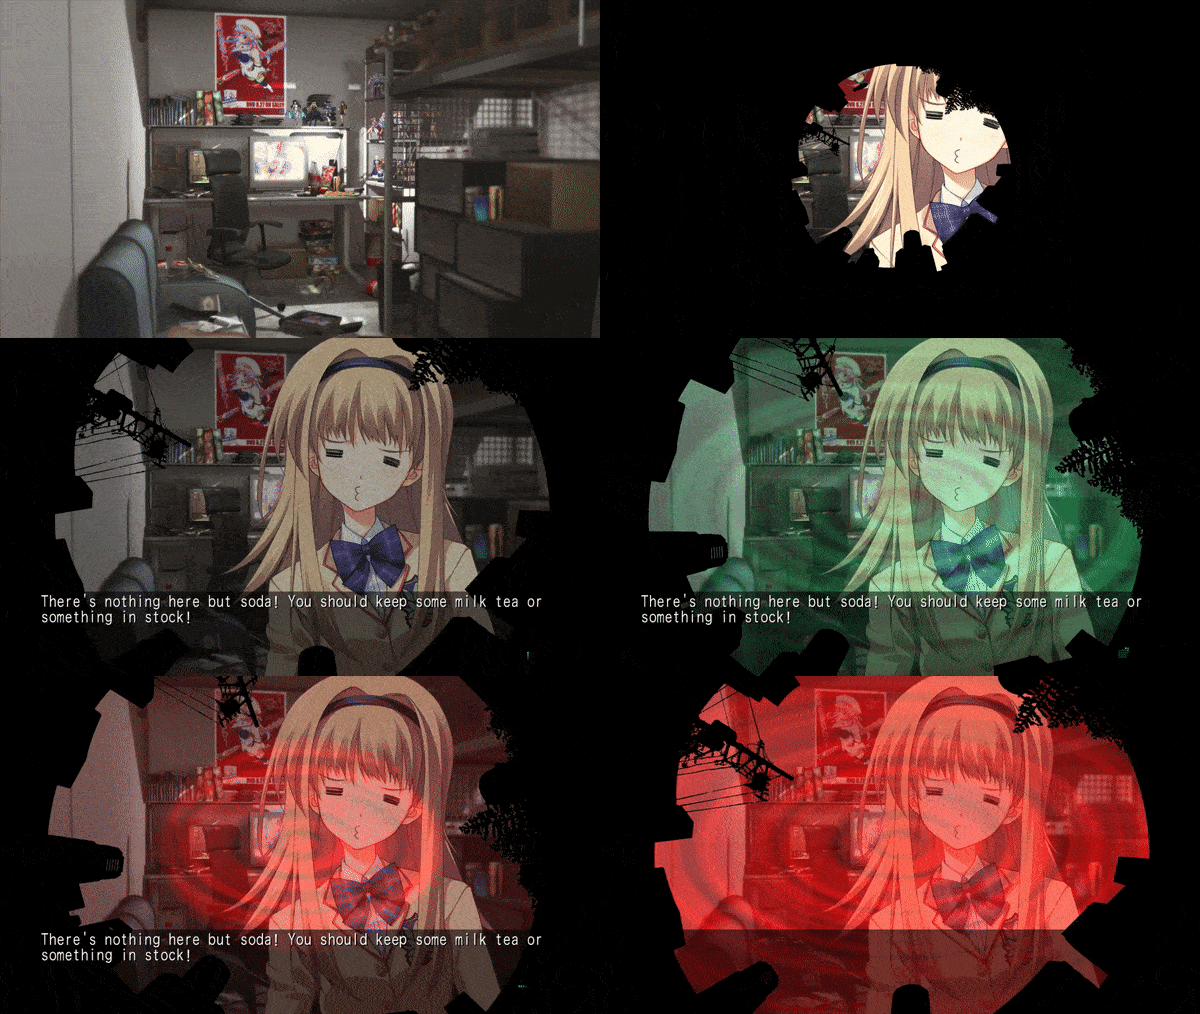
The Delusion Trigger system in Chaos;Head NoAH

Use the ZL button on Switch or click the green button on Steam to lock into a positive delusion; the ZR button or red button to lock into a negative delusion; or proceed normally to stay in reality.

During your first playthrough, it is recommended that you experiment by trying out different positive, negative, and neutral choices as you go.

You are locked into the Silent Sky ending during your first playthrough; your delusions will have no effect on the ending until your second and subsequent playthroughs.

Silent Sky Ending

Chapter One

Toward the beginning of this chapter, you will be presented with a series of YES/NO questions related to school swimsuits. Answer these questions as you’d like to.

For the “...wore glasses.” question, select YES on one playthrough to make Hazuki wear glasses and unlock “Four-Eyes Fan.” You will also need to see the alternate no-glasses appearance for CG completion; the Anima Archetype route later in this guide uses NO.

Chapter Two

You will be presented with a checklist of questions when Takumi visits the hospital. Your results will appear in the “TIPS” menu.

Save before submitting the questionnaire.

  • Check every box, submit the questionnaire, and open the resulting medical-chart entry in the TIPS menu to unlock “Gigalomaniac.”
  • Reload your save, submit the questionnaire with no boxes checked, and open the resulting TIPS entry to unlock “Ria-ju.”

Chapter Six

You will be presented with a series of YES/NO questions during the scene at the O-FRONT.

To view this scene’s bad ending, save your game here; then, answer NO, NO, and NO.

To proceed with the story, answer YES, YES, NO, NO, and YES.

Chapter Ten

You will achieve the Silent Sky ending during this chapter.

The following story achievements unlock naturally while completing this first playthrough.

Crying Sky Ending

After you have achieved the Silent Sky ending, your next stop will be the Crying Sky ending. Reaching this ending will require you to start a new game and view at least ten of the below-listed scenes. To save time, you can engage the Skip mode to fast-forward through text you have already read.

You can make different swimsuit-preference choices, if you’d like, to alter a certain character’s appearance; you can also experiment with the hospital checklist (e.g., check off no, some, most, or all options) to receive different results in the TIPS menu.

There will be a handful of new scenes interspersed throughout the story. The skip mode will disengage during these scenes. Be sure to read them for additional context.

Note that you may additionally encounter new YES/NO prompts tied to the heroines throughout this playthrough. We will use these in subsequent playthroughs to branch into heroine routes, but for the time being, answer NO to all of these prompts.

Chapter One

Chapter Two

Chapter Three

Chapter Four

Chapter Five

Chapter Six

O-FRONT YES/NO prompts: YES, YES, NO, NO, YES.

Chapter Seven

Chapter Eight

Chapter Nine

If you’ve successfully viewed at least ten of the above scenes, the game will branch into the Crying Sky ending during chapter ten’s underground train station scene.

The route itself only needs ten points. The full 18-scene set and its achievement are covered again in Achievement Cleanup.

Daydream Ending

Once you’ve achieved the Crying Sky ending, restart the game and make the following choices.

Chapter One

  • Subsequent YES/NO prompts:
    • “I like big sister types more.”: NO
    • “I like girls with no chests.”: YES
    • “I have another 3D girlfriend besides you.”: NO
    • “You’re cute, I’ll admit that.”: YES
    • “I want to kiss you!”: YES

As you progress, a handful of Nanami-related intermissions will be interspersed throughout the story. The skip mode will disengage during these scenes. Be sure to read them for additional context.

The game will branch into the Daydream ending in chapter six.

Moon and Sun Ending

Chapter One

  • Subsequent YES/NO prompts:
    • “It’s just a coincidence.”: NO
    • “I’m hallucinating.”: NO
    • “Whoever did it is inside the school.”: YES
    • “They’re taunting me.”: YES
    • “I want to erase it now.”: YES

As you progress, a handful of Yua-related intermissions will be interspersed throughout the story. The skip mode will disengage during these scenes. Be sure to read them for additional context.

The game will branch into the Moon and Sun ending in chapter seven.

A Bloody Contract for Your Sins Ending

Chapter One

Trigger #2: In the Base with Nanami, choose Negative or remain Neutral.

Chapter Two

  • Subsequent YES/NO prompts:
    • “FES wants me to save her.”: YES
    • “I want to give in to her temptation.”: NO
    • “It would feel so good to jump.”: YES
    • “I’d be willing to die if I could do it with FES.”: YES
    • “I want to be released from everything.”: YES

As you progress, a handful of Ayase-related intermissions will be interspersed throughout the story. The skip mode will disengage during these scenes. Be sure to read them for additional context.

The game will branch into the A Bloody Contract for Your Sins ending in chapter seven.

A Disease that Leads to Slaughter Ending

Chapter One

Trigger #2: In the Base with Nanami, choose Negative or remain Neutral.

Chapter Two

Trigger #8: During the Phantasm performance, choose Positive or remain Neutral.

Chapter Three

Trigger #10: At Center Street with Sena, choose either Positive or Negative.

  • Subsequent YES/NO prompts:
    • “She came to save me?”: YES
    • “The transfer student is a professional exorcist.”: YES
    • “Her wimpy looks are actually camouflage.”: YES
    • “She is here to kill Rimi.”: YES
    • “You two kill each other!”: NO

As you progress, a handful of Kozue-related intermissions will be interspersed throughout the story. The skip mode will disengage during these scenes. Be sure to read them for additional context.

The game will branch into the A Disease that Leads to Slaughter ending in chapter seven.

Deus Ex Machina Ending

Chapter One

Trigger #2: In the Base with Nanami, choose Negative or remain Neutral.

Chapter Two

Trigger #8: During the Phantasm performance, choose Positive or remain Neutral.

Chapter Three

Trigger #10: At Center Street with Sena, remain Neutral.

  • Subsequent YES/NO prompts:
    • “Look at me more.”: YES
    • “For her, I wouldn’t mind begging on my knees.”: YES
    • “I wish she’d step on me, actually.”: YES
    • “That sword’s going to run me through, isn’t it? I can tell.”: YES
    • “She’s going to kill me with that sword…”: NO

As you progress, a handful of Sena-related intermissions will be interspersed throughout the story. The skip mode will disengage during these scenes. Be sure to read them for additional context.

The game will branch into the Deus Ex Machina ending in chapter seven.

Anima Archetype Ending

Chapter One

  • Subsequent YES/NO prompts:
    • “…tied her hair with ribbons.”: YES
    • “…wore glasses.”: NO
    • “…wore over-the-knee socks.”: YES
    • “…wore a long skirt.”: NO
    • “…was posing like a soldier at attention.”: YES

As you progress, a handful of Rimi-related intermissions will be interspersed throughout the story. The skip mode will disengage during these scenes. Be sure to read them for additional context.

The game will branch into the Anima Archetype ending in chapter eight.

Blue Sky Ending

A new main menu option, “blue sky,” will unlock when you have completed all other routes. Select it to begin the true ending.

A series of YES/NO prompts will be presented to you. Answer them as follows: YES, YES, NO, NO, NO, YES, YES, YES, YES, YES, YES, YES, YES, YES, YES.

Continue to achieve the Blue Sky ending and complete Chaos;Head NoAH.

Achievement Cleanup

After completing all nine endings, use the following checklists to collect the remaining achievements and event CGs.

Whose Eyes Are Those?

This achievement is connected to the additional scenes used to reach the Crying Sky ending. Start a new playthrough and view every scene listed below. The route itself only needs ten of them, but the achievement requires all 18 credited scenes.

These checkboxes are synchronized with the Crying Sky route above, so anything you already marked there remains complete here.

Positive and Negative Delusions

To unlock “Positive Person” and “Negative Person,” view both the positive and negative variation of every Delusion Trigger. Use the chapter-by-chapter checklist below while replaying the game. The green boxes track positive delusions and the red boxes track negative delusions.

Chapter 1

#01 · 1-1 At the first classroom Delusion Trigger, before Takumi’s profile-style questions. Suimei Academy — classroom
#02 · 1-2 When Nanami visits the Base and takes Takumi’s Cola. Base
#03 · 1-3 When Yua approaches Takumi near the crossing. Shibuya — Scramble Crossing
#04 · 1-4 During Yua’s visit to the Base. Base
#05 · 1-5 While discussing the Gero Froggy charms and the sense of déjà vu. Shoto Park

Chapter 2

#06 · 2-1 In the waiting room before Takumi’s examination. AH Tokyo General Hospital — waiting room
#07 · 2-2 During the psychiatric examination. AH Tokyo General Hospital — examination room
#08 · 2-3 During FES’s performance at GIGANTES. GIGANTES live house
#09 · 2-4 When Neidhardt speaks to Takumi during ESO. Base — ESO

Chapter 3

#10 · 3-1 When Takumi notices Sena and her DI-sword. Shibuya Center Street
#11 · 3-2 When Takumi and Misumi encounter FES in the corridor. Suimei Academy — corridor
#12 · 3-3 When Rimi first appears inside the Base. Base
#13 · 3-4 When Kozue is introduced as the new transfer student. Suimei Academy — classroom
#14 · 3-5 When Takumi listens to the strange voicemail on the rooftop. Suimei Academy — rooftop
#15 · 3-6 While Takumi waits at the checkout. LANSOW convenience store

Chapter 4

#16 · 4-1 During the awkward classroom conversation with Rimi. Suimei Academy — classroom
#17 · 4-2 When Sena pulls Takumi toward the train. Shibuya — Scramble Crossing / train
#18 · 4-3 When Yua confronts Takumi at @cafe. @cafe
#19 · 4-4 While Takumi waits in the park and notices the people around him. Miyashita Park
#20 · 4-5 During Ayase’s demonstration involving a duplicate version of herself. Underground passage

Chapter 5

#21 · 5-1 After Takumi panics and becomes sick at school. Suimei Academy — corridor
#22 · 5-2 Between the MHV shelves while discussing the Phantasm CD. MHV record store
#23 · 5-3 When Takumi handles the toy DI-sword in front of Rimi. Base
#24 · 5-4 When Takumi pictures how Rimi will appear during her visit. Base
#25 · 5-5 At the school entrance when someone covers Takumi’s eyes. Suimei Academy — shoe lockers

Chapter 6

#26 · 6-1 After the earthquake, during Shogun’s chat with Takumi. Base
#27 · 6-2 During Sena’s confrontation in Shoto Park. Shoto Park
#28 · 6-3 When Nanami’s phone and the package become the focus in the Base. Base
#29 · 6-4 Before Shogun’s five DI-sword YES/NO questions on the rooftop. O-FRONT rooftop
#30 · 6-5 After the five DI-sword YES/NO questions. O-FRONT rooftop

Chapter 7

#31 · 7-1 When Takumi wakes in the hospital. AH Tokyo General Hospital — patient room
#32 · 7-2 During the classroom bullying scene. Suimei Academy — classroom
#33 · 7-3 Immediately before and during the DQN ambush at the crossing. Shibuya — crossing
#34 · 7-4 While shopping at Roft with Kozue. Roft general store
#35 · 7-5 When Kozue offers Sena a Crunchy-kun snack near the police box. Shibuya — police box

Chapter 8

#36 · 8-1 When Rimi joins Takumi in the Base. Base
#37 · 8-2 When Takumi and Misumi first enter Ayase’s hospital room. AH Tokyo General Hospital — Ayase’s room
#38 · 8-3 During Ayase’s Gladioul/Black Knight explanation. AH Tokyo General Hospital — Ayase’s room
#39 · 8-4 After Rimi’s confrontation involving Ayase. AH Tokyo General Hospital — waiting room
#40 · 8-5 During the conversation about Takumi going home. Base rooftop

Chapter 9

#41 · 9-1 During Rimi’s revelation about Takumi’s existence. Shimokitazawa — family home
#42 · 9-2 When Takumi crosses Yamate-dori in despair. Yamate-dori
#43 · 9-3 In the Base while Takumi considers suicide. Base
#44 · 9-4 When Nanami appears in the Base after Takumi’s collapse. Base
#45 · 9-5 During the final crowd sequence at the Scramble Crossing. Shibuya — Scramble Crossing

Missable CGs

Some event CGs only appear when you let a Delusion Trigger pass without choosing either the positive or negative option. Use the eight neutral-choice boxes below to cover these missable variations.

For “CG Complete,” also make sure you have seen both of Hazuki’s Chapter One appearance variations by answering the glasses question both YES and NO on separate playthroughs.

Thanks and Notes

A special thanks to repgatu, RCgamer77, MrMonday for original baseline content, and gameline.jp for inspiration.

Unauthorized rehosting of this guide is not condoned. Please do not rehost and/or modify this guide to host in other spaces without permission. Contact [email protected] to request permission.

Found an issue with this guide? Feel free to reach out; we’ll address it!

Every route, ending, delusion, CG, and achievement is complete. Congratulations on finishing Chaos;Head NoAH!
Guide complete

You completed all 34 achievements, all 9 endings, every positive and negative delusion, every missable CG variation, and the full 18-scene “Whose Eyes Are Those” set. Chaos;Head NoAH now appears among your completed titles.

The following is a guide to playing through Chaos;Head NoAH in the optimal route order and achieving all endings.

Chaos;Head NoAH is available on Steam and Nintendo Switch digitally; a physical release through the Chaos; Double Pack is also available.

The recommended play order is as follows: Silent Sky → Crying Sky → Daydream → Moon and Sun → A Bloody Contract for Your Sins → A Disease that Leads to Slaughter → Deus Ex Machina → Anima Archetype → Blue Sky.

Players using the Chaos;Head NoAH Overhaul Patch are advised to follow this guide instead.

You can watch the video, or read the guide below.

Table of Contents

Preface: Delusion Triggers

At different points in Chaos;Head NoAH, you will come into contact with the “Delusion Trigger” system. Through it, you can choose if the protagonist experiences a positive delusion, a negative delusion, or no delusion at all.

Use the ZL button on Switch or click the green button on Steam to lock into a positive delusion; the ZR button or red button to lock into a negative delusion; or proceed normally to stay in reality.

During your first playthrough, it is recommended that you experiment by trying out different positive, negative, and neutral choices as you go.

You are locked into the Silent Sky ending during your first playthrough; your delusions will have no effect on the ending until your second and subsequent playthroughs.

Silent Sky

Chapter One: Toward the beginning of this chapter, you will be presented with a series of YES/NO questions related to school swimsuits. Answer these questions as you’d like to.

Chapter Two: You will be presented with a checklist of questions when Takumi visits the hospital. Answer these questions as you’d like to. Your results will appear in the “TIPS” menu.

Chapter Six: You will be presented with a series of YES/NO questions during the scene at the O-FRONT.
To view this scene’s bad ending, save your game here; then, answer NO, NO, and NO.
To proceed with the story, answer YES, YES, NO, NO, and YES.

Chapter Ten: You will achieve the Silent Sky ending during this chapter.

Crying Sky

After you have achieved the Silent Sky ending, your next stop will be the Crying Sky ending. Reaching this ending will require you to start a new game and view at least eleven of the below-listed delusions. To save time, you can engage the Skip mode to fast-forward through text you have already read.

You can make different swimsuit-preference choices, if you’d like, to alter a certain character’s appearance; you can also experiment with the hospital checklist (e.g., check off no, some, most, or all options) to receive different results in the TIPS menu.

There will be a handful of new scenes interspersed throughout the story. The skip mode will disengage during these scenes. Be sure to read them for additional context.

Note that you may additionally encounter new YES/NO prompts tied to the heroines throughout this playthrough. We will use these in subsequent playthroughs to branch into heroine routes, but for the time being, answer NO to all of these prompts.

Chapter One:

  • Delusion Trigger #1: While in class, talking to Misumі ー Neutral
  • Delusion Trigger #3: Yua is looking at you from across the street ー Neutral

Chapter Two:

  • Delusion Trigger #8: During the Phantasm performance, while watching FES ー Positive
  • Delusion Trigger #9: After the Pһantasm performance, while playing ESO ー Positive

Chapter Three:

  • Delusion Trigger #12: At the Base, looking at your monitor, right before Rimi’s first appearance ー Positive
  • Delusion Trigger #14: On the school rooftop, after Rimi talks to you in class ー Negative

Chapter Four:

  • Delusion Trigger #17: At the net café with Yua ー Neutral
  • Delusion Trigger #18: In the park ー Negative

Chapter Five:

  • Delusion Trigger #20: The first trigger of the chapter, at school ー Positive
  • Delusion Trigger #24: After school, at the shoe lockers when Rimi covers your eyes ー Negative

Chapter Six:

  • Delusion Trigger #25: When Shougun enters the chat after the earthquake ー Positive
  • Delusion Trigger #28: Looking down at the crowd ー Neutral
  • O-FRONT YES/NO prompts: YES, YES, NO, NO, YES.

Chapter Seven:

  • Delusion Trigger #30: After waking up in the hospital and talking to the nurse ー Negative
  • Delusion Trigger #34: While talking to Sena and Kоzue ー Negative

Chapter Eight:

  • Delusion Trigger #36: When you and Misumi enter Ayase’s hospital room ー Neutral
  • Delusion Trigger #37: When Aуase starts talking to you about defeating Gladiale in her hospital room ー Negative

Chapter Nine:

  • Delusion Trigger #43: When you hear Nanami’s voice after chatting with Grimm ー Positive
  • Delusion Trigger #44: When you’re standing before a crowd of people ー Neutral

If you’ve successfully viewed at least eleven of the above scenes, the game will branch into the Crying Sky ending during chapter ten’s underground train station scene.

Daydream

Once you’ve achieved the Crying Sky ending, restart the game and make the following choices.

Chapter One:

  • Delusion Trigger #1: While in class, talking to Misumi ー Negative
  • Delusion Trigger #2: In the Base with Nanami ー Positive
  • Subsequent YES/NO prompts:
    • “I like big sister types more.”: NO
    • “I like girls with no chests.”: YES
    • “I have another 3D girlfriend besides you.”: NO
    • “You’re cute, I’ll admit that.”: YES
    • “I want to kiss you!”: YES

As you progress, a handful of Nanami-related intermissions will be interspersed throughout the story. The skip mode will disengage during these scenes. Be sure to read them for additional context.

The game will branch into the Daydream ending in chapter six.

Moon and Sun

Chapter One:

  • Delusion Trigger #1: While in class, talking to Misumі ー Neutral
  • Subsequent YES/NO prompts:
    • “It’s just a coincidence.”: NO
    • “I’m hallucinating.”: NO
    • “Whoever did it is inside the school.”: YES
    • “They’re taunting me.”: YES
    • “I want to erase it now.”: YES

As you progress, a handful of Yua-related intermissions will be interspersed throughout the story. The skip mode will disengage during these scenes. Be sure to read them for additional context.

The game will branch into the Moon and Sun ending in chapter seven.

A Bloody Contract for Your Sins

Chapter One:

  • Delusion Trigger #1: While in class, talking to Misumі ー Negative
  • Delusion Trigger #2: In the Base with Nanami ー Negative or Neutral

Chapter Two:

  • Delusion Trigger #8: During the Phantasm performance, while watching FES ー Negative
  • Subsequent YES/NO prompts:
    • “FES wants me to save her.”: YES
    • “I want to give in to her temptation.”: NO
    • “It would feel so good to jump.”: YES
    • “I’d be willing to die if I could do it with FES.”: YES
    • “I want to be released from everything.”: YES

As you progress, a handful of Aуase-related intermissions will be interspersed throughout the story. The skip mode will disengage during these scenes. Be sure to read them for additional context.

The game will branch into the A Bloody Contract for Your Sins ending in chapter seven.

A Disease that Leads to Slaughter

Chapter One:

  • Delusion Trigger #1: While in class, talking to Misumi ー Negative
  • Delusion Trigger #2: In the Base with Nanami ー Negative or Neutral

Chapter Two:

  • Delusion Trigger #8: During the Pһantasm performance, while watching FES ー Positive or Neutral

Chapter Three:

  • Delusion Trigger #10: At Center Street with Sena ー Positive or Negative
  • Delusion Trigger #13: In the classroom, Kоzue has just joined your class ー Positive
  • Subsequent YES/NO prompts:
    • “She came to save me?”: YES
    • “The transfer student is a professional exorcist.”: YES
    • “Her wimpy looks are actually camouflage.”: YES
    • “She is here to kill Rimi.”: YES
    • “You two kill each other!”: NO

As you progress, a handful of Kоzue-related intermissions will be interspersed throughout the story. The skip mode will disengage during these scenes. Be sure to read them for additional context.

The game will branch into the A Disease that Leads to Slaughter ending in chapter seven.

Deus Ex Machina

Chapter One:

  • Delusion Trigger #1: While in class, talking to Misumi ー Negative
  • Delusion Trigger #2: In the Base with Nanami ー Negative or Neutral

Chapter Two:

  • Delusion Trigger #8: During the Pһantasm performance, while watching FES ー Positive or Neutral

Chapter Three:

  • Delusion Trigger #10: At Center Street with Sena ー Neutral
  • Subsequent YES/NO prompts:
    • “Look at me more.”: YES
    • “For her, I wouldn’t mind begging on my knees.”: YES
    • “I wish she’d step on me, actually.”: YES
    • “That sword’s going to run me through, isn’t it? I can tell.”: YES
    • “She’s going to kill me with that sword…”: NO

As you progress, a handful of Sena-related intermissions will be interspersed throughout the story. The skip mode will disengage during these scenes. Be sure to read them for additional context.

The game will branch into the Deus Ex Machina ending in chapter seven.

Anima Archetype

Chapter One:

  • Delusion Trigger #1: While in class, talking to Misumi ー Positive
  • Subsequent YES/NO prompts:
    • “…tied her hair with ribbons.”: YES
    • “…wore glasses.”: NO
    • “…wore over-the-knee socks.”: YES
    • “…wore a long skirt.”: NO
    • “…was posing like a soldier at attention.”: YES

As you progress, a handful of Rimi-related intermissions will be interspersed throughout the story. The skip mode will disengage during these scenes. Be sure to read them for additional context.

The game will branch into the Anima Archetype ending in chapter eight.

Blue Sky

A new main menu option, “blue sky,” will unlock when you have completed all other routes. Select it to begin the true ending.

A series of YES/NO prompts will be presented to you. Answer them as follows: YES, YES, NO, NO, NO, YES, YES, YES, YES, YES, YES, YES, YES, YES, YES.

Continue to achieve the Blue Sky ending and complete Chaos;Head NoAH.

Thanks and Notes

A special thanks to repgatu, RCgamer77, MrMonday for original baseline content, and gameline.jp for inspiration.

Unauthorized rehosting of this guide is not condoned. Please do not rehost and/or modify this guide to host in other spaces without permission. Contact [email protected] to request permission.

Found an issue with this guide? Feel free to reach out; we’ll address it!

Kiri Kiri Basara's chief editor. Ensures the quality and consistency of text throughout the site. En dash fanatic.

Support us

Support us monthly on Patreon for exclusive posts from just €1/month, or make a one-time donation through Ko-fi. Every contribution helps keep KKB running and ad-free.

Join Patreon Donate on Ko-fi

KKB Community

0 comments

Join the discussion